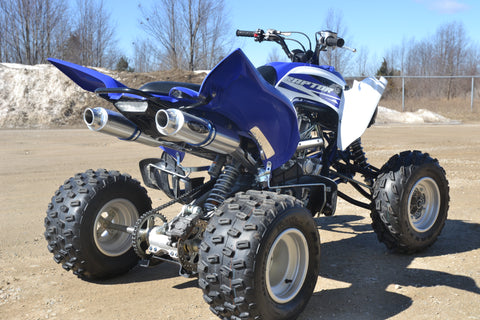
You've got your Barker's Dual Exhaust System in hand, so now what? Follow these handy installation instructions to help you remove the stock system and get your new system on your Raptor.
Tools Needed:
-
8MM, 10MM, 12MM and 13MM Socket or Wrench
-
Spring Puller
The first step is to remove your Stock Exhaust System. When removing it be careful not to lose or damage the exhaust gasket on the exhaust port of the motor. You will also re-use your two nuts used to hold the stock system on. Once you have removed the stock system you’ll want to unbolt the screw holding your front right fender in place. You’ll have to pull the fender out slightly to get the new header in place.
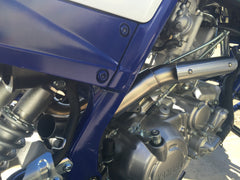
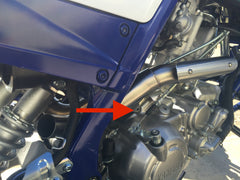
Start by inserting the split rear portion in first under your frame towards the rear shock. Once you have the rear in there you can carefully put the front into place by holding the fender away a bit as shown in these next few pictures.
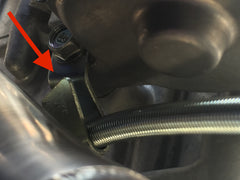
Now before you can go any further you will need to Bend your Parking Brake Bracket down slightly to clear the pipe as shown in the picture above and below. (Red Arrow)
Once you have the Pipe in place, make sure you have the Exhaust Gasket in place and go ahead and slide the flange onto the two studs coming out of the head and only hand tighten at this point using the two nuts that came off your stock system.
You will want to snug them just tight enough to hold in place but be able to rotate the pipe freely yet.
The next step is to remove the bolt shown above and then rotate the pipe until the tab lines up with the bolt hole. Go ahead and insert the bolt back into place and be sure to install the lock washer that we supplied into the hole shown above. You can tighten this bolt down but do not tighten the header nuts yet.
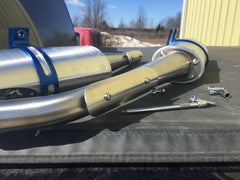
Now that the Header is mounted in place and still able to move, you’ll want to grab each can and megaphone assembly and install your billet clamps onto the cans. Find a nice clean soft place to work so you don’t scratch things up. Also before beginning, make sure you have the clamps with the Tabs facing away from the Barker’s tag.
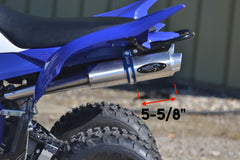
Now spread the clamp apart and insert a small wedge in the slot to keep it spread apart. This could be a small chunk of wood or some heavy folded up cardboard just something to keep it spread apart. Carefully slide the clamp over the can watching you don’t scratch it up. The clamp needs to be 5-5/8” from the Tip end of the can as shown here.
Now that you have the clamps mounted to the cans go ahead and carefully insert each side into the slip joints on the front Header and start the bolt that holds the clamp but do not fully tighten. Repeat this step on the other side so you have both cans mounted but not tightened down. Bolt holes used are the front bolts on your rear grab bar.

The next step is to install the Springs that connect the front and back halves of the pipes.
***NOTE*** Make sure you have Safety Glasses on and a Spring Puller to complete this step. Be very careful when pulling the springs onto the tabs.

Now you should have everything installed but NOT tightened down anywhere. Before tightening down, you are going to need to look at the split in front of the shock. You need to center the split so it has equal clearance on each side of the shock. This is done by leaving the rear bolt in place and carefully rotating the front of the head pipe up or down to center it on the shock.
Once it is centered where you like it go ahead and snug down the Header nuts at the very front of the system. You can now tighten down the Billet Clamps that hold the cans in place making sure the cans are aligned equally also.
Final Note: After you have ridden and warmed the pipe up a few times be sure to go back and re-tighten and check all bolts and connections to ensure everything stayed nice and tight. Now have fun and enjoy your new Barker’s Exhaust!
Do you have any tips for installing a Barker's Dual Exhaust System on the 2015/2016 Raptor? Feel free to share your thoughts in the comments below!
How To Install a Barker's Dual Exhaust on a 2015/2016 Yamaha Raptor 700
You've got your Barker's Dual Exhaust System in hand, so now what? Follow these handy installation instructions to help you remove the stock system and get your new system on your Raptor.
Tools Needed:
The first step is to remove your Stock Exhaust System. When removing it be careful not to lose or damage the exhaust gasket on the exhaust port of the motor. You will also re-use your two nuts used to hold the stock system on. Once you have removed the stock system you’ll want to unbolt the screw holding your front right fender in place. You’ll have to pull the fender out slightly to get the new header in place.
Start by inserting the split rear portion in first under your frame towards the rear shock. Once you have the rear in there you can carefully put the front into place by holding the fender away a bit as shown in these next few pictures.
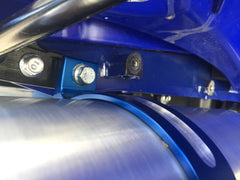
Now before you can go any further you will need to Bend your Parking Brake Bracket down slightly to clear the pipe as shown in the picture above and below. (Red Arrow)
Once you have the Pipe in place, make sure you have the Exhaust Gasket in place and go ahead and slide the flange onto the two studs coming out of the head and only hand tighten at this point using the two nuts that came off your stock system.
You will want to snug them just tight enough to hold in place but be able to rotate the pipe freely yet.
The next step is to remove the bolt shown above and then rotate the pipe until the tab lines up with the bolt hole. Go ahead and insert the bolt back into place and be sure to install the lock washer that we supplied into the hole shown above. You can tighten this bolt down but do not tighten the header nuts yet.
Now that the Header is mounted in place and still able to move, you’ll want to grab each can and megaphone assembly and install your billet clamps onto the cans. Find a nice clean soft place to work so you don’t scratch things up. Also before beginning, make sure you have the clamps with the Tabs facing away from the Barker’s tag.
Now spread the clamp apart and insert a small wedge in the slot to keep it spread apart. This could be a small chunk of wood or some heavy folded up cardboard just something to keep it spread apart. Carefully slide the clamp over the can watching you don’t scratch it up. The clamp needs to be 5-5/8” from the Tip end of the can as shown here.
Now that you have the clamps mounted to the cans go ahead and carefully insert each side into the slip joints on the front Header and start the bolt that holds the clamp but do not fully tighten. Repeat this step on the other side so you have both cans mounted but not tightened down. Bolt holes used are the front bolts on your rear grab bar.
The next step is to install the Springs that connect the front and back halves of the pipes.
***NOTE*** Make sure you have Safety Glasses on and a Spring Puller to complete this step. Be very careful when pulling the springs onto the tabs.
Now you should have everything installed but NOT tightened down anywhere. Before tightening down, you are going to need to look at the split in front of the shock. You need to center the split so it has equal clearance on each side of the shock. This is done by leaving the rear bolt in place and carefully rotating the front of the head pipe up or down to center it on the shock.
Once it is centered where you like it go ahead and snug down the Header nuts at the very front of the system. You can now tighten down the Billet Clamps that hold the cans in place making sure the cans are aligned equally also.
Final Note: After you have ridden and warmed the pipe up a few times be sure to go back and re-tighten and check all bolts and connections to ensure everything stayed nice and tight. Now have fun and enjoy your new Barker’s Exhaust!
Do you have any tips for installing a Barker's Dual Exhaust System on the 2015/2016 Raptor? Feel free to share your thoughts in the comments below!